It has been a long time since my last post. Today I would like to share some experience in 3d-printing with you. At the moment my printer runs almost 24/7, because Christmas is coming quite fast and I need a lot of gifts for all the persons around me.
When I browsed the internet for some ideas I stumbled across lithophanes. For all of you who do not know what lithophanes are, here is the description from Wikipedia:
A lithophane (French: lithophanie) is an etched or molded artwork in very thin translucent porcelain that can only be seen clearly when back lit with a light source.
...
A lithophane presents a three-dimensional image - completely different from two-dimensional engravings and daguerreotypes that are "flat". The images change characteristics depending on the light source behind them. -- Wikipedia
In this post you will get the most important information about preparation and printing. Be sure to read the post until the end, because there are tips within the whole text.
Step by step
The next few lines will give you a quick summary of all the steps which need to be done to get a lithophane out of your 3d printer.
- Prepare the image.
There are many ways to prepare your image and it depends based on what you would like to achieve. The boyfriend of my sister came to me and asked if it is possible to print lithophanes of their dogs. Furthermore he asked me if it is possible to focus on them, so that there are no surroundings. So this task was very simple because I just needed to remove the background and colourize it with a colour in contrast to the subject.


Another task during this Christmas-session was to print a landscape. In this case you may need to sharpen the edges of some areas of your image. If this is not enough you may need to edit them and brighten them up or darken them. (Unfortunately my friend told me that he does not want to publish this picture here. But I think I will post another example, whenever I need to reprint a landscape.)
I edited all the pictures with the freeware GIMP. It is a great program and has all the capabilities of the expensive programs. The only downside is, that it is not so user-friendly...but you get used to it and can achieve the same great results. - Create the .stl file for your image.
The simplest way to do this is to use the great tool from Nested Cube. You just need to upload the image and adopt the parameters. All of my prints were with the basic settings very good. - Slice the .stl file to a .gcode file.
Just use your preferred slicer to do this step. (For lithophanes with fine details I go down with the speed from 60 mm/s to 45 mm/s.) - Upload the sliced image to your 3d-printer.
- Print your lithophane (and be patient).
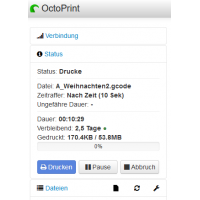
This is the estimated time (2,5 days!) for a lithophane with 200 mm by 200 mm. I was shocked when I opened my Octoprint for the first time after the start. I was very happy when the print finished within 15 hours. - Get your lithophane off the build-plate and put it in front of a light source.


Watch out!
In the last chapter I wrote that all the prints were very good with the basic settings. That is right, but I did some mistakes in the beginning! I thought "You are printing with white filament so the draft of the website is good to go. In reality that's not right because white areas will be printed thicker. But thick parts will not be dark when you light it from behind, because less light will shine through it. So it is very important that you keep in mind that the things you would like to put in the focus should be as thin as possible. Sometimes you just need to invert the image in the tool from Nested Cube.